Monday, November 3, 2014

Give Thanks Chalkboard- Emerson

It's November.
Time to eat!
Oops I better back up, 
it's November time to give thanks!
Today I have a few November-y projects to share.
First up is my Give Thanks board.
I used the same frame for the Give Thanks board that I had used for the 49er's board,
 that I made back in Feb. of 2013.
Actually I used it at a bridal shower this past summer too.
The sign was cute but the quality of the photograph was lousy!

So as you can see I have made good use of this baby.
Just a few coats of acrylic craft paint and I have a new frame to play with!
It makes a cute prop at a gathering.
 Originally I was looking for a short thanksgiving phrase to use.
And a BIG graphic.
Then I came across this ditty from Ralph Waldo Emerson.
Of course it was perfect, and a bit longer than I had planned on.
 I had intended on stenciling my short phrase and BIG graphic with white paint to get a cool chalkboard art look. 
Like I did for the 49er sign above.
Ugh I didn't want to cut a long phrase stencil and I didn't want to stencil a loooong phrase.
Gee do I sound ungrateful or what???

So my first solution was the easy solution.
Let's just print the phrase... 
 Here was my clever idea.....
This did not work for me.
Sometimes my cleverness just doesn't translate to paper...
It might make a nice card though.
I
 So I knew to get the look I wanted,
 I was either stenciling 
or cutting vinyl letters with my Silhouette Cameo.
Out came the vinyl...
It did take a whole afternoon to do the board.
Trying to line everything up can drive you crazy!
My other project is this cute pumpkin below.
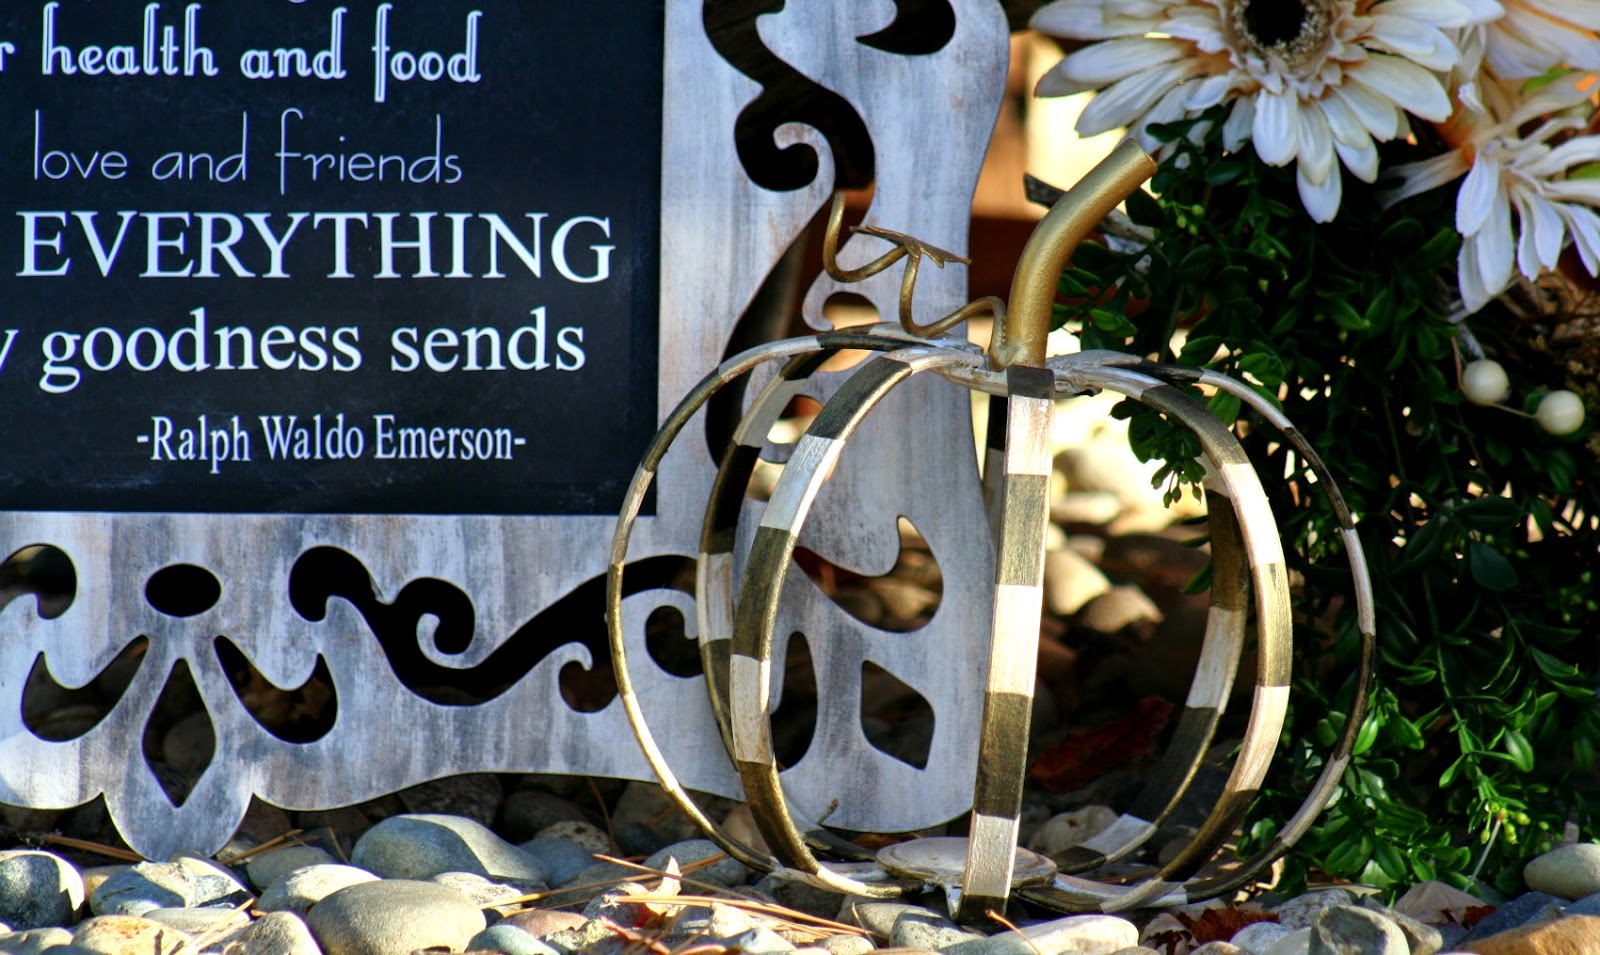
 I decided to add some MacKenzie - Childs flair to this rusty old girl.
 Black and white checks dress up just about anything!
Add a bit of gold and you're done!
I just did my usual MO, I painted the pumpkin white.
Then I marked off where I wanted the black squares and painted them black.
Then I painted the stem and leaf gold.
 I used acrylic paint from the craft store on the pumpkin and frame.
 I basically did the same thing with the frame.
I painted the frame white over the red I had painted it for the 49er's board.
It took about three coats. 
It's best to let the paint dry completely between coats.
Then I brushed watered down black paint all over the frame.
Then I wiped the black off with a wet paper towel.
Then I did the same thing with watered down or thinned brown paint.
I think I painted the black on twice to get the look I wanted.
It's hit or miss with me and crafting.
 I like the white washed look of the frame.
It looks good with the chalkboard background.
Which isn't really a chalkboard, it's black poster board.
I rubbed some chalk on the poster board to give it a "seasoned" look.
Then I just stuck the vinyl letters on the poster board.
 Is it time to eat yet?
I think I've earned a piece of pumpkin pie.
 Today I give thanks that you stopped by to visit!
I appreciate your time!
Click here to see the SF 49er board post.
I am totally ready to make a Green Bay Packers chalkboard next!
Ignore the above comment, I am just teasing my sister.

 Sign up to follow MarvinsDaughters with email or on Facebook or Pinterest.
Have a wonderful day,

Tuesday, October 28, 2014

Autumn Porch Decor

Who doesn't love autumn?
The gorgeous colors of fall, cooler weather and of course pumpkin $eason.
That's what my husband calls it.
Oh how I love pumpkin $eason!
 I love every pumpkin I see, small, medium, large I want them all!
 I love a pumpkin with a cool stem. I always think yes a pumpkin picker who gets it!
 This was a good year for pumpkin $tems. I found $everal I loved.
 I know I have mentioned my awesome neighbors before, here is proof of how awesome they are.
  My sweet thoughtful neighbor picked up these colanders and the red rusty tool box for me at a garage sale this past summer!  I know, how lucky am I??
I did spray paint the colanders silver. I left the handles brass, loving them!

I used my Silhouette Cameo to cut Happy Autumn out of white vinyl and then stuck it on my sandwich chalkboard. The vinyl is removable, I can just peel it off.

 Here is the family wheelbarrow decorated for fall. 
Nothing weird about that!
 I decorate this wheelbarrow for just about every occasion, 
at this point the neighbors would think it's weird if I didn't decorate it.

 Here is my globe planter filled with autumn goodies.
 They are all artificial but still look pretty.
All the flowers in the photo below are real. 
Would someone please tell them that it is autumn.
They still feel like blooming, no reason for the pumpkins to get all the attention I guess.

Thank you for stopping by today.
I appreciate your visit.
Sign up to follow MarvinsDaughters with email or on Facebook or Pinterest.
Hope you are having a wonderful pumpkin $eason!

Thursday, October 23, 2014

DIY Black & White Checkered Pumpkins

A Stroll Thru Life
Yippee!!! Thank you Marty for featuring the pumpkins this week!
Make sure to visit Marty at her blog: A Stroll Thru Life
Click here to view a tour of her lovely home!

Thank you to Kathy over at Life on Lakeshore Drive for giving the pumpkins a feature too!
I am soooooo flattered!
Click here to visit Kathy, she throws a fun party!

I'm Pick of the Bunch Feature Button


Happy Fall Y'all!
Inspired by Mackenzie - Childs Pumpkins
Well here we are in the middle of autumn...Mother Nature is proudly displaying her colorful artwork.
Inspired by Mackenzie - Childs Pumpkins
 And so am I! Proudly displaying my artwork that is.
I love the way my checkered pumpkins stand out against the fall colors.
Inspired by Mackenzie - Childs Pumpkins
 These pumpkins are obviously inspired by Mackenzie - Childs. 
I mean if you are going to be inspired you might as well be inspired by the best!
Inspired by Mackenzie - Childs Pumpkins
As much as I love how these faux pumpkins look outdoors, I knew they needed a nice home indoors.
So I went to Costco to get a free box...to paint like a boot tray I saw in the MC catalog.
Seriously you had to know that was coming!
Inspired by Mackenzie - Childs Pumpkins
 The box I made was inspired by the Mackenzie - Childs boot tray, which sells for $495.
While I am sure it is worth every penny, I just felt $495 was maybe a bit much for a pumpkin display.
My husband thought the same thing, no arguments he totally agreed with me on this!
Inspired by Mackenzie - Childs Pumpkins
 There might have been some talk about who puts boots on a $495 tray?
I am sure some of you are thinking who paints a Costco box to look like a $495 boot tray.
Yeah we talked about that too..
Inspired by Mackenzie - Childs Pumpkins
 I still went ahead and painted the box and he ended up liking it.
Inspired by Mackenzie - Childs Pumpkins
He even cut the cute decorative wood trim for me.
He figured he was saving himself $495....
Inspired by Mackenzie - Childs - Boot tray
 Just to make my box unique I added the word pumpkin, spelled in French no less, with some gold paper letters I cut with the Silhouette Cameo. 
I am betting it's the only box of its kind here in Nevada.
Pun intended.
Inspired by Mackenzie - Childs Pumpkins
Geeze I photographed these guys from every possible angle!
Inspired by Mackenzie - Childs Pumpkins
 Close ups too!
Inspired by Mackenzie - Childs Pumpkins
Here is a quick tutorial on how I painted these beauties.
I cut a paper square (1 1/4 inch) and traced around it on the fake pumpkin.
Then I marked the squares that I wanted to paint black with an X.
Then I painted them black.
I let them dry for a few hours.
 Then I watered down (thinned) some gold metallic acrylic paint and brushed it all over the pumpkin.
Done.
Inspired by Mackenzie - Childs Pumpkins
 Same idea for the "boot tray" except I had to paint the box white first.
Which took about four coats.
It works best if you let the paint dry between coats.
 At this point I was thinking maybe $495 isn't really that much...
At first I just painted a gold stripe on the bottom edge of the box.
Ugh that wasn't going to work.
Off to the home center for some edging I went.
I think the wood trim really finishes the box off. It almost hides the fact that it's really a Costco box.
I said almost not totally!
So everyone is happy, the pumpkins, my husbands wallet and myself.
Inspired by Mackenzie - Childs Pumpkins
 Thank you to my dear friend Paula for giving me the faux white pumpkins...not orange ones, phew!
Inspired by Mackenzie - Childs Pumpkins
 And thank you to Costco for the free box.
Inspired by Mackenzie - Childs Pumpkins
Total cost of this project $13.95 plus tax.
The wood trim was the only thing I purchased.
So the MC boot tray is $495, the pumpkins are $50 for an 8" pumpkin (I have 2) 
 and $100 for the 9" pumpkin.
 So I'd say this was a cost effective project!

Thank you for visiting MarvinDaughters I appreciate your time and sense of humor!
Follow me with email or on Facebook or Pinterest.
 Have a wonderful day,